Mold lurking in an air conditioner isn’t only gross — it can quietly harm health and sap efficiency. A musty odor when the system starts, allergy flare-ups as it runs, or dark specks on the blower, coil cover, or drain pan all point to trouble. In the steps below, you’ll see exactly how to remove mold from your AC indoor unit using safe, equipment-friendly methods that also protect your lungs. You’ll pick up prevention tactics, know when it’s time to call a pro, and learn how to keep your air cleaner. Well, here it is — a practical, science-backed plan for removing mold from your AC indoor unit without damaging it.
Why Mold Grows Inside Your AC (and Why It Matters)
Inside the indoor unit, conditions mimic a tiny terrarium: damp, dark, and dust-fed. Warm air crosses a cold evaporator coil, moisture condenses, and drips into the pan. When airflow is choked by a dirty filter or a tight return, or the drain line clogs, moisture lingers. Add organic particles (dust, skin cells, pet dander), and a thriving micro-ecosystem follows.
Early signs can be subtle — a whiff of “old basement” as the blower starts, specks in the pan, or light gray fuzz on the blower wheel or insulation. Some people feel headaches, sneezing, or eye irritation only while the AC runs. Most household molds aren’t life-threatening, yet exposure can aggravate allergies and asthma. The U.S. Centers for Disease Control and Prevention notes potential symptoms like nasal stuffiness, wheezing, and skin or eye irritation, with higher risk for those with asthma or immune suppression. For background, see CDC’s overview: https://www.cdc.gov/mold/.
Efficiency takes a hit, too. A slimy pan or a partially blocked coil reduces heat transfer and airflow, forcing longer runtimes, higher energy bills, and earlier wear-out. What’s interesting too, field experience shows even a lightly fouled coil can cut capacity by 5–15%, leaving the house clammy despite long cycles — and that extra indoor moisture only feeds more mold and odor.
The upside: most homeowners can handle the fix with basic tools and careful safety steps. Manufacturers recommend regular filter changes, coil cleaning with an approved cleaner (not bleach), and a clear drain line. Knock out those basics and you not only remove mold from your AC indoor unit — you also boost comfort and indoor air quality. EPA’s homeowner guidance is a useful reference: https://www.epa.gov/mold/mold-cleanup-your-home.
Humidity is a major lever. Aim for indoor relative humidity between 30% and 50%, especially during cooling season. Once RH climbs above 60%, risk rises sharply.
| Indoor Relative Humidity (RH) | Mold Risk | Notes |
|---|---|---|
| 20–30% | Low | Air may feel dry; uncommon in summer when AC runs. |
| 30–50% | Optimal | EPA’s comfort range that also helps curb mold. |
| 60%+ | High | Favors growth; check filtration, coil cleanliness, and the drain line. |
Safety First: Tools, PPE, and Prep Checklist
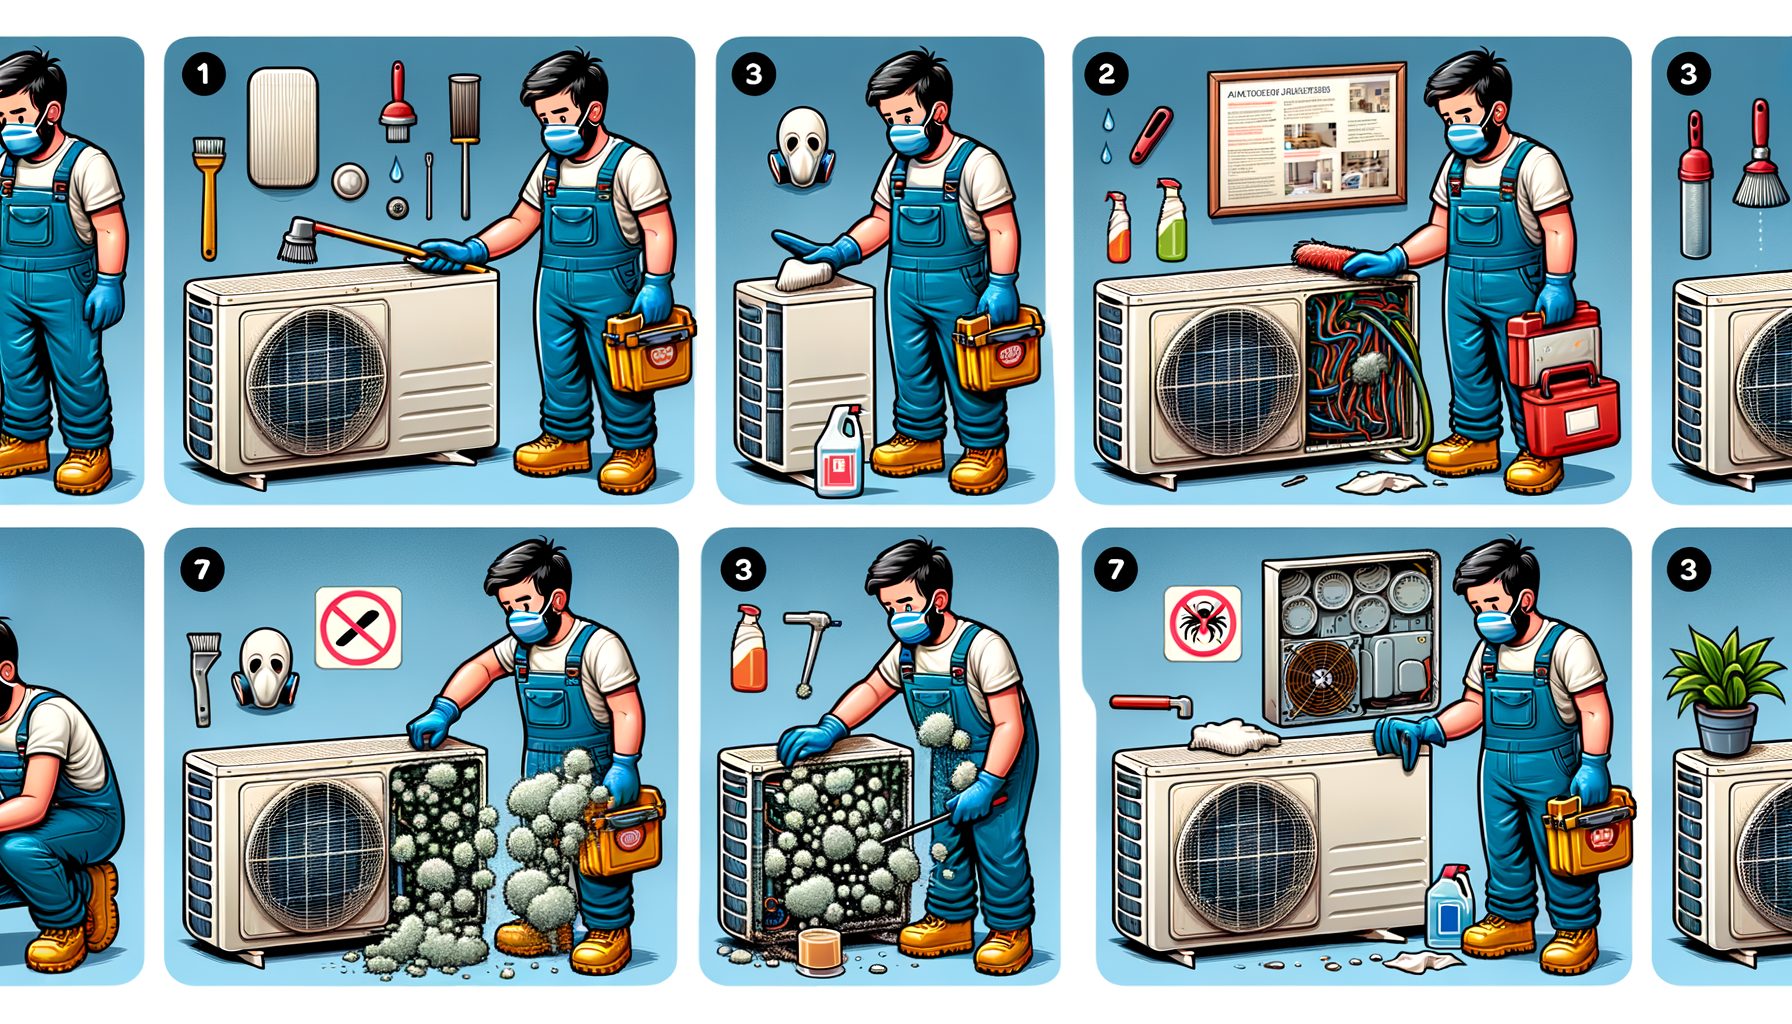
Mold cleanup protects you as much as it cleans the equipment. Plan the job and set up a safe workspace so you don’t breathe spores, mix chemicals, or splash water onto electronics.
Gear up with disposable gloves, safety glasses, and a well-fitted respirator rated N95/FFP2 or better. Those with asthma or mold sensitivity should consider asking someone else to do the work or hire a professional. Open nearby windows for ventilation, and keep kids and pets out.
Power must be shut down at the thermostat and the breaker. Non-negotiable. Indoor units contain moving parts and sensitive control boards that don’t mix with water or sprays. Wait a minute after power-off to confirm the blower won’t start.
Gather supplies: a flashlight; a soft brush; microfiber cloths; a vacuum with a brush attachment (HEPA preferred); an HVAC-approved foaming coil cleaner (non-acidic, labeled for evaporators); 3% hydrogen peroxide or an EPA-registered disinfectant for non-porous surfaces; distilled white vinegar for the drain line; a small nylon brush or old toothbrush; a wet/dry vacuum and a short length of tubing for the drain; and a trash bag for debris and the used filter. Keep a few old towels handy for drips. Avoid bleach on aluminum coils — corrosion and fumes are real risks. Stick with coil-safe cleaners and the manufacturer’s guidance.
Snap photos of panels and wiring before you open anything so reassembly is exact. Corral screws in a small tray. If internal fiberglass insulation looks moldy or degraded, go easy — aggressive scrubbing can release fibers. Lightly wipe with a damp cloth, and replace if contamination is heavy.
Two critical cautions: never mix chemicals (for example, bleach and ammonia create toxic gas), and never soak control boards or motors. When unsure about a cleaner’s compatibility, don’t spray it directly. Apply it to a cloth and wipe carefully. For general cleanup guidance, the EPA resource is here: https://www.epa.gov/mold/mold-cleanup-your-home.
Step-by-Step: How to Remove Mold from Your AC Indoor Unit
Step 1: Power down. Set the thermostat to Off, then cut power at the air handler or furnace breaker. Confirm the blower won’t start.
Step 2: Open the access panel. Remove the front panel to expose the blower section and drain pan. If the coil has its own cover, take it off carefully and note tape or screws for later.
Step 3: Remove the air filter. Toss disposable filters. For reusables, wash per the manufacturer’s instructions and dry completely. A dirty filter starves airflow and feeds mold.
Step 4: Dry vacuum dust. Using a brush attachment, gently vacuum visible dust from the blower housing, inlet, and accessible cabinet areas. Keep the vacuum head away from control boards.
Step 5: Clean the evaporator coil with a coil-safe cleaner. Apply a non-acid foaming cleaner evenly across the coil fins and follow the label’s dwell time to lift biofilm. For heavily clogged sections, use a soft brush with light pressure, moving in the direction of the fins to avoid bending them. Many products are self-rinsing; condensate will carry the cleaner into the pan. If not, wipe excess foam with a damp microfiber cloth. Avoid bleach on coils.
Step 6: Disinfect non-metal cabinet surfaces. On plastic housings, metal panels, and the interior of the access door (away from electrical parts), spray 3% hydrogen peroxide or an EPA-registered disinfectant and observe the labeled contact time before wiping. Spot-treat visible growth on blower wheel blades with a lightly damp cloth; rotate the wheel by hand as you go. Do not saturate the motor.
Step 7: Clean the drain pan. Remove standing water using towels or a wet/dry vacuum. Scrub biofilm with a nylon brush and a small amount of coil cleaner or mild detergent. Rinse lightly with clean water and wipe dry. Then this: drop in a drain pan tablet if your manufacturer recommends it.
Step 8: Flush the condensate drain line. Find the cleanout or the line near the pan. Pour 1/2 to 1 cup of distilled white vinegar into the line to help dissolve slime. If blocked, attach a wet/dry vacuum to the outdoor drain termination to pull out the clog, then flush with vinegar again. During cooling, you should see a steady drip at the outside drain.
Step 9: Wipe insulation and accessible interior. If internal insulation is intact with only light surface growth, damp-wipe with peroxide and allow full contact time before drying. Heavily colonized or water-damaged insulation is best replaced.
Step 10: Dry and reassemble. Remove residual moisture. Reinstall panels and a new filter sized correctly with a MERV rating your system can handle. Seal the coil cover so air cannot bypass the filter.
Step 11: Restart and test. Restore power and set the thermostat to Cool. Let the system run 15–20 minutes. Odors should drop sharply. Persistent smell? Repeat light cleaning on the blower wheel and recheck the pan for stagnant water.
Step 12: Monitor. Over the next week, watch for recurring odors or moisture. If growth returns quickly, an underlying issue may be at play: high indoor humidity, oversized equipment short-cycling, or a stubborn drain restriction.
Time and effort: plan on 60–120 minutes for a typical split-system air handler. Keep chemicals off electronics, and don’t spray into return ducts. For tight-access ducted systems, ceiling cassettes, or packaged units, a pro can safely disassemble and deep-clean.
Pro tip: set the thermostat fan to Auto, not On, during cooling. In On mode, the blower can re-evaporate moisture from the coil and pan, raising indoor humidity and encouraging mold.
Keep It Gone: Prevention That Works and When to Call a Pro
Prevention wins the long game. The two biggest levers are humidity control and cleanliness. Keep indoor RH between 30% and 50% (EPA) using a reliable hygrometer. If your home lingers above 55–60% RH, add a whole-home dehumidifier or use a portable unit where humidity peaks. A properly sized AC reduces humidity during longer cycles; an oversized system short-cycles and may leave air damp.
Filtration and airflow also matter. Use the highest MERV filter your system tolerates without causing static-pressure problems (often MERV 8–11 on legacy equipment, up to MERV 13 on some newer systems). Change filters every 1–3 months in cooling season, more often with pets or construction dust. A clean filter keeps organic particles off the coil and pan. Make sure supply vents and returns stay unobstructed.
Maintenance cadence: check the drain line monthly in cooling season and flush with 1/2 cup of vinegar. Inspect the pan for standing water every 2–3 months. Clean the evaporator coil annually with an HVAC-approved cleaner or include it in a spring tune-up. If growth keeps coming back, consider a professionally installed UV-C light in the coil compartment. UV-C can inhibit microbial growth on coil and pan when sized and placed correctly; it serves as a supplement, not a substitute, for cleaning. For science-based background on indoor mold and moisture, see EPA’s course: https://www.epa.gov/mold/mold-course-chapter-2.
Ventilation helps, too. Run kitchen and bath exhaust fans to remove moisture at the source. Seal obvious duct leaks and improve return pathways to cut dust infiltration. In humid climates, keep windows closed during muggy weather and avoid leaving the thermostat fan in On for long periods.
When to call a pro: visible growth covering more than about 10 square feet (EPA’s general DIY threshold), heavy contamination on internal insulation, rapid return of mold within weeks, musty ducts throughout the home, or if you’re immunocompromised or having significant symptoms. A qualified HVAC contractor or mold remediation company can deep-clean the coil and blower, replace contaminated insulation, and address root causes like undersized returns, poor drainage, or sizing issues. To vet providers, look for ACCA certifications (https://www.acca.org/) and NADCA for duct cleaning (https://nadca.com/), ask for before/after photos, and request a written scope of work. Typical costs vary by region: evaporator coil cleaning often runs $100–$400, drain line service $75–$200, duct cleaning $400–$1,000 (whole home), UV-C installation $150–$600, and targeted mold remediation from $500 into the low thousands depending on severity and access.
FAQs
Q: Is bleach safe to use on AC coils? A: It isn’t. Bleach can corrode aluminum fins and copper, and the fumes are hazardous. Use an HVAC-approved evaporator coil cleaner and, for non-porous surfaces, 3% hydrogen peroxide or an EPA-registered disinfectant per label directions.
Q: How often should the condensate drain line be cleaned? A: During cooling season, check monthly and pour 1/2–1 cup of distilled white vinegar into the cleanout. If drainage slows or water appears in the pan, vacuum the line from the outdoor termination and flush again.
Q: Will a UV-C light solve mold in my AC? A: It helps inhibit growth on coil surfaces and the drain pan when properly installed, but it doesn’t replace cleaning or humidity control. Best results come from a bundle of tactics: clean coil, clear drain, good filtration, and RH below 50%.
Q: Should the thermostat fan be set to On or Auto? A: Choose Auto during cooling. On can re-evaporate moisture from the coil and pan, raising indoor humidity and elevating mold risk. Some advanced thermostats include “dehumidify” modes that optimize runtime to lower RH.
Q: Can AC mold make people sick? A: Exposure can trigger allergy-like symptoms and worsen asthma in sensitive individuals, according to CDC and EPA. If symptoms appear when the AC runs, clean the unit and improve humidity control. Seek medical advice for persistent or severe symptoms.
Conclusion: Your Clear Path to a Cleaner, Healthier AC
You now have a straightforward plan to remove mold from your AC indoor unit and keep it from returning. We started with root causes — moisture, dust, and dark surfaces inside the air handler — and covered how growth affects health, odors, and efficiency. Safety essentials came next (PPE, power off, ventilation), followed by the exact tools and a step-by-step method that respects your equipment: coil-safe cleaner for the evaporator, peroxide or an EPA-registered disinfectant for non-porous parts, a thorough drain pan scrub, and a vinegar flush for the condensate line. Finally, prevention — humidity control, proper filtration, routine drain maintenance, and solid airflow — turns a one-time cleanup into a long-term indoor air upgrade, with clear signals for when to bring in a certified pro.
Next steps are simple: block off 60–90 minutes this week to inspect your system. Swap the filter, clean the drain pan, and flush the line. If the coil looks dusty or slimy, apply a coil-safe cleaner. Pick up a hygrometer and aim for 30–50% RH. Roadblocks like inaccessible panels, saturated insulation, or persistent odors? Contact a qualified HVAC contractor and request documented coil cleaning and drain service. Use the resources below (EPA, CDC, ACCA, NADCA) to guide choices and confirm best practices.
Clean air starts with a clean system. Take control today, and your AC can reward you with quieter operation, fresher air, and better comfort all season. If you could do just one thing right now, what would it be — flush the drain, swap the filter, or check humidity? Choose one and get started. Small actions stack up, and your lungs (and electric bill) will thank you.
Sources:
CDC – Mold: https://www.cdc.gov/mold/
EPA – Mold Cleanup in Your Home: https://www.epa.gov/mold/mold-cleanup-your-home
EPA – Mold Course (Moisture and Mold): https://www.epa.gov/mold/mold-course-chapter-2
Air Conditioning Contractors of America (ACCA): https://www.acca.org/
National Air Duct Cleaners Association (NADCA): https://nadca.com/